

What is a Resource?
A Resource is any system you want to protect with Formal—databases, APIs, Kubernetes clusters, SSH servers, and more. Resources define the endpoints that Connectors can route traffic to and enforce policies on.Supported Resource Types
Formal supports a wide range of technologies:PostgreSQL
Including RDS, Aurora, Supabase, AlloyDB
MySQL
Including MariaDB, RDS, Aurora
MongoDB
Self-hosted and Atlas
Snowflake
Cloud data warehouse
BigQuery
Google Cloud data warehouse
ClickHouse
OLAP database
DynamoDB
NoSQL database
S3
Object storage
HTTP
REST APIs and web services
gRPC
High-performance RPC framework
Web
Web applications and portals
SSH
Linux servers and bastions
Kubernetes
K8s clusters (kubectl exec)
Creating a Resource
- Web Console
- Terraform
1
Navigate to Resources
Go to Resources in the Formal console
2
Click New Resource
Select the New Resource button
3
Fill in connection details
- Name: A friendly identifier
- Type: The technology (PostgreSQL, MongoDB, etc.)
- Host: Database hostname or IP address
- Port: Connection port (e.g., 5432 for PostgreSQL)
- Space: (Optional) Logical grouping for access control
4
Configure advanced options
- Enable Termination Protection to prevent accidental deletion
- Set up Native Users for database authentication
- Configure TLS if needed
Testing Resource Connectivity
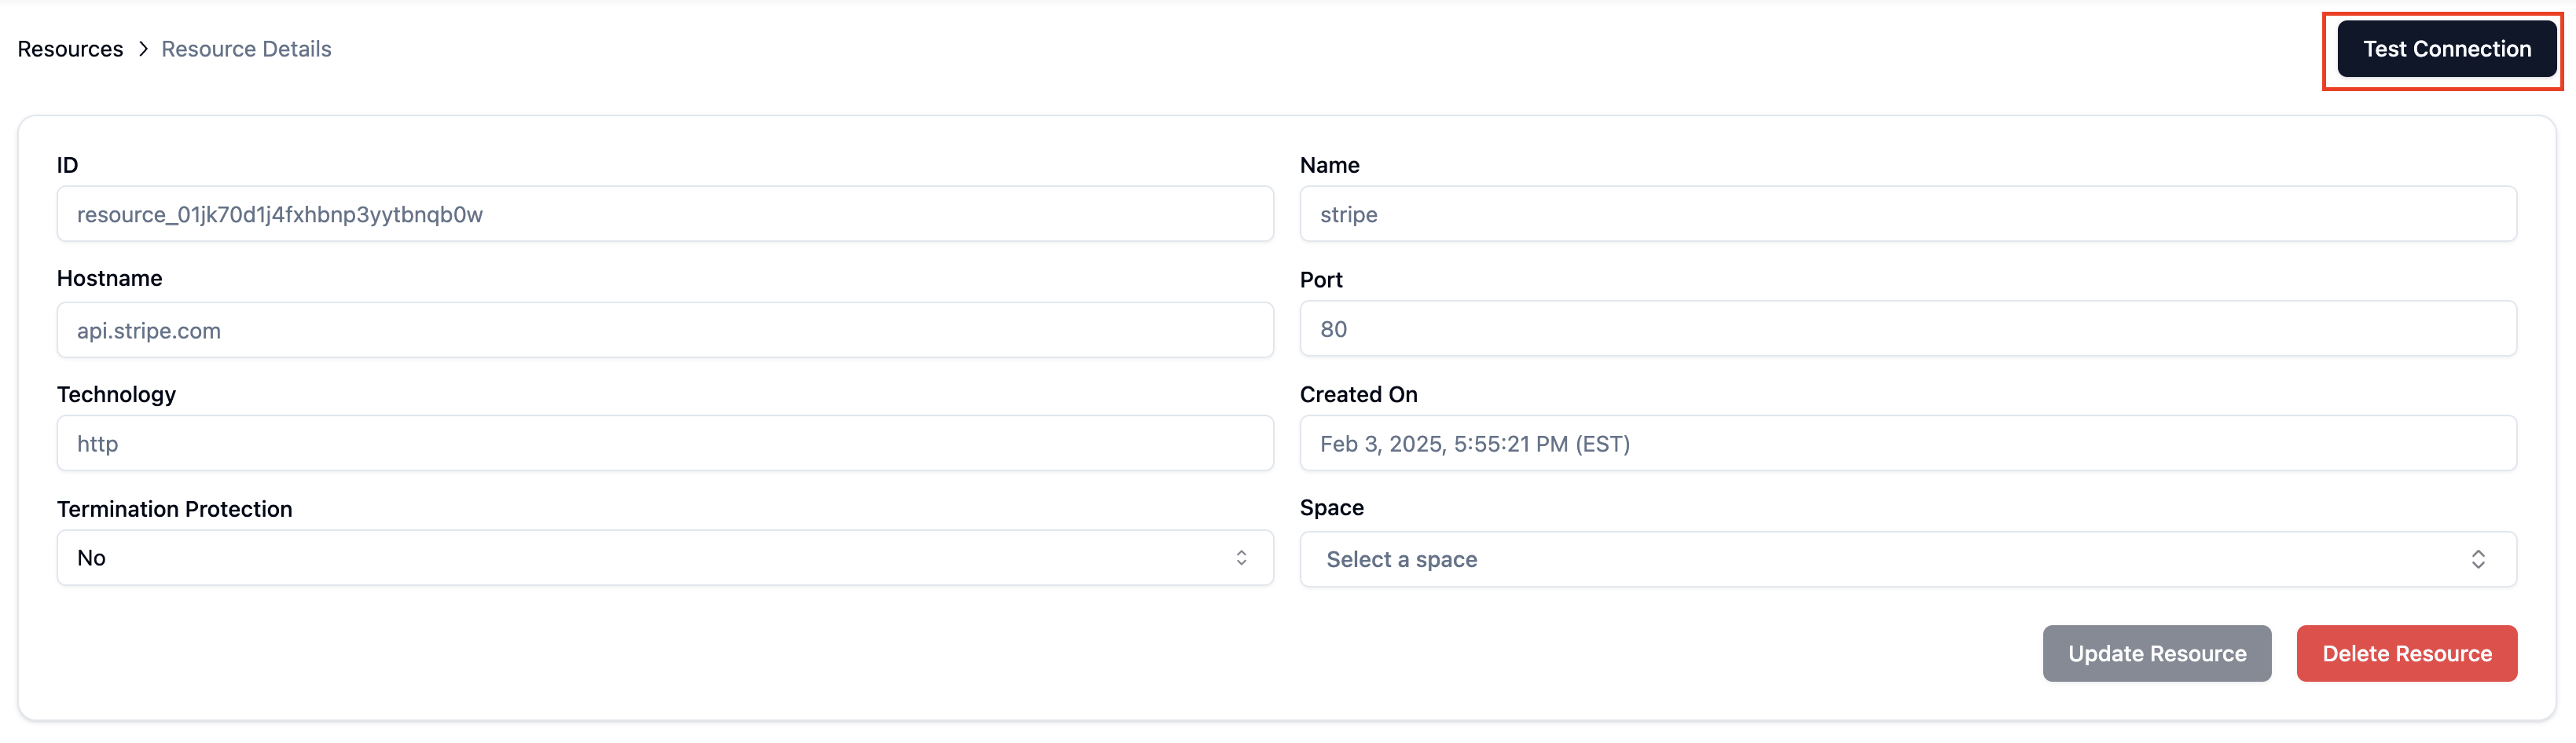
You can test resource connectivity directly from the Formal console to verify that your resources are accessible and properly configured.Test Connection from Resource Details
- Navigate to Resources in the Formal Console
- Click on the resource you want to test
- In the Resource Details page, click the Test Connection button in the top-right corner
- The system will attempt to connect to your resource and display the results
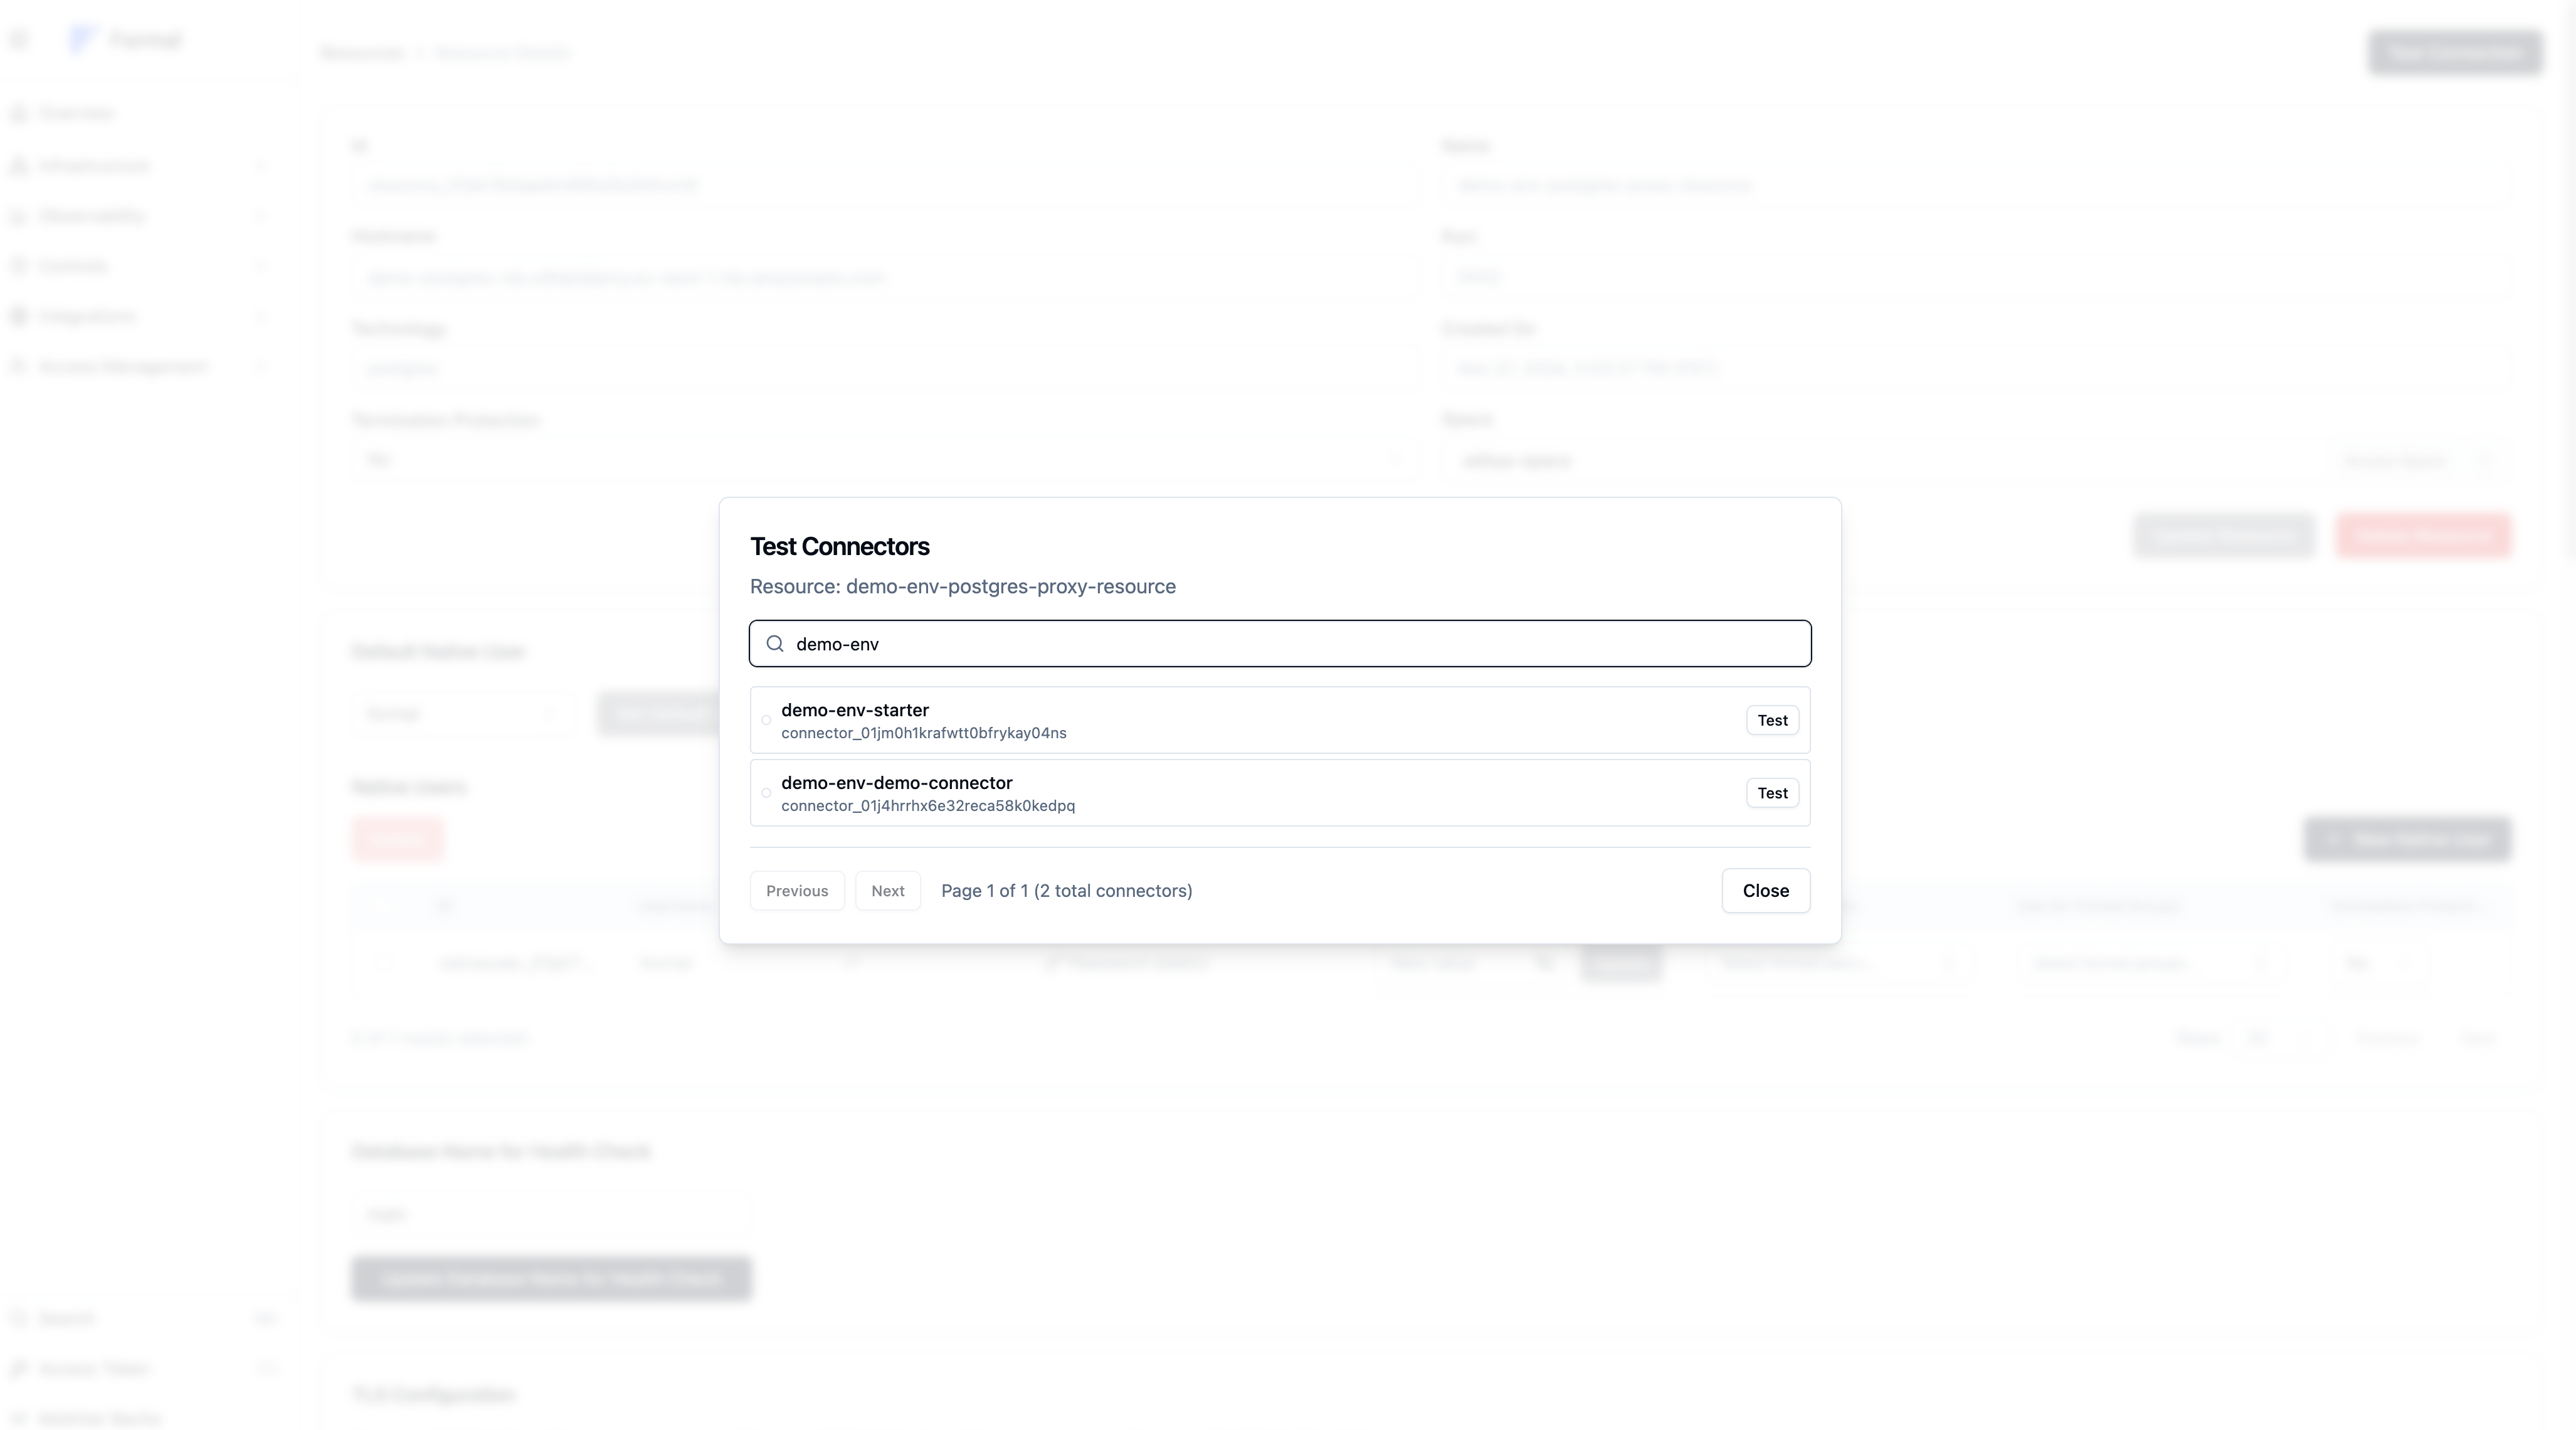
Test Specific Connectors
- From the Resource Details page, click Test Connectors
- Select the connector you want to test from the list
- Click Test to initiate a health check for that specific connector
- Monitor the test status - you’ll see “Testing…” with a spinner during the test
- Review the results to identify any connectivity issues
Configure Health Check Database
For database resources, you can specify which database to use for health checks:- In the Resource Details page, scroll to the Database Name for Health Check section
- Enter the database name (e.g., “main”, “postgres”, “mysql”)
- Click Update Database Name for Health Check to save the configuration
- This database will be used for all subsequent health checks
Understanding Test Results
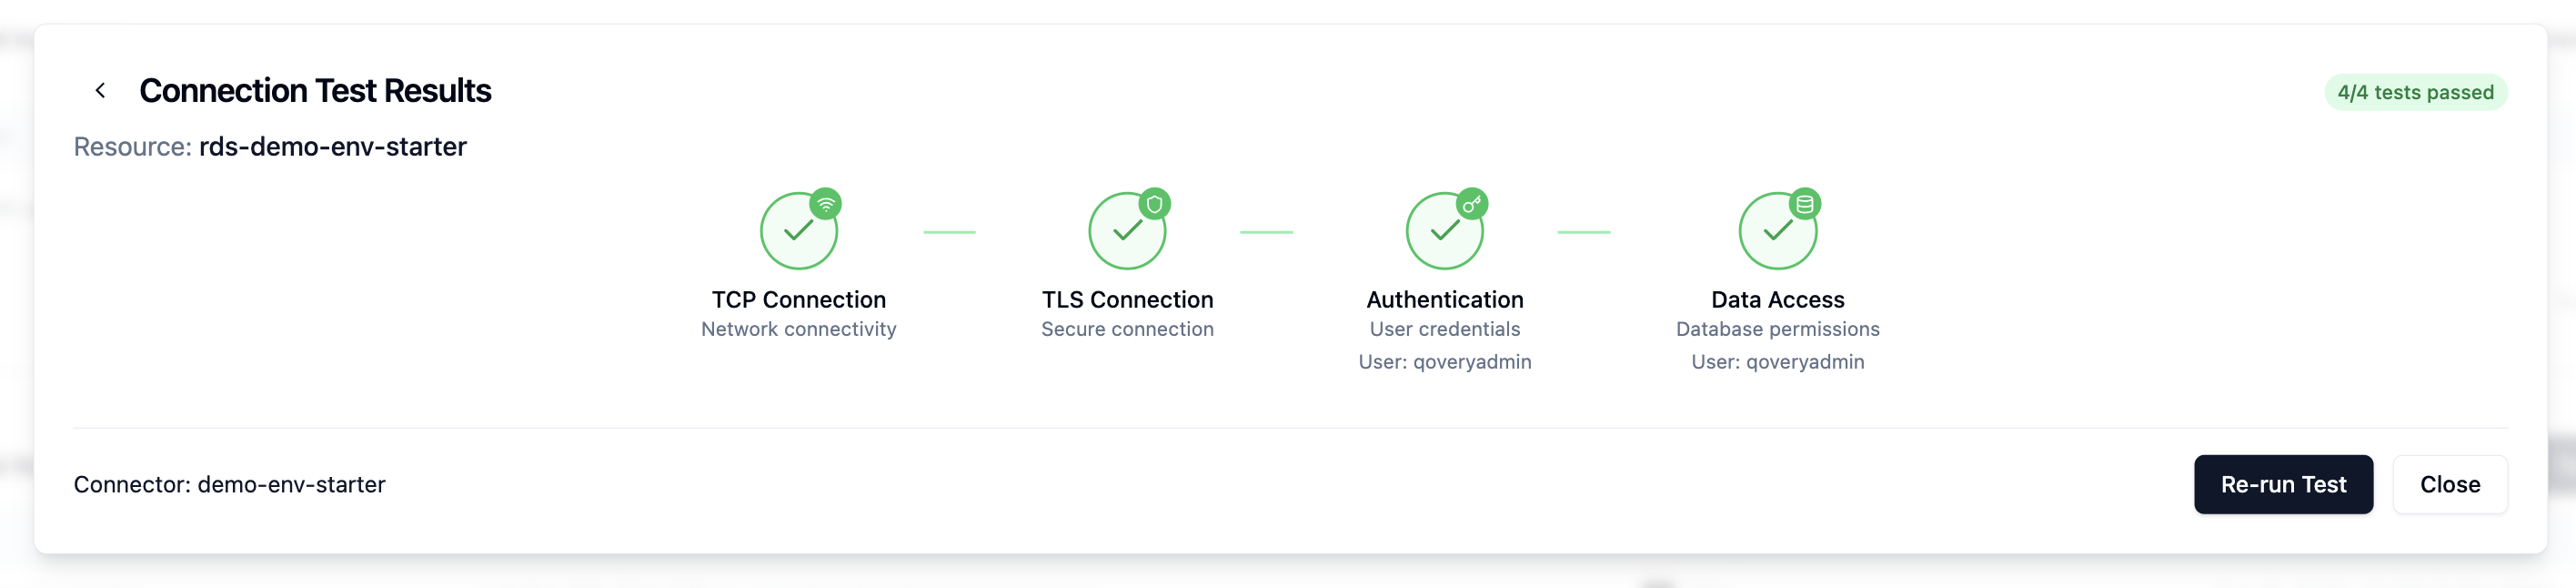
Successful Connection Test
When all tests pass, you’ll see a green “3/3 tests passed” indicator and a multi-stage validation flow:- TCP Connection - Verifies network connectivity to the resource
- TLS Check - Protocol-specific TLS handshake validation (when applicable)
- Configuration Check - Validates health check settings
- Authentication - Validates user credentials (shows the authenticated user)
- Data Access - Confirms database permissions for the user
- Connector name and instance information
- Each validation stage with green checkmarks
- Specific user details for authentication and data access
- Resource identification
Health Check Stages Explained
Each health check performs multiple validation stages to ensure complete connectivity: TCP Check: Basic network connectivity verification- Verifies the connector can reach the resource endpoint
- Tests basic network connectivity
- Only applicable to TLS-enabled resources
- Validates certificate and encryption setup
- Verifies health check configuration is valid
- Checks database name and other settings
- Tests authentication using configured native users
- Includes AWS IAM authentication for RDS resources
- Executes simple queries to verify data access
- Confirms the connector can interact with the resource
Failed Connection Tests
When tests fail, you’ll see error indicators and specific failure messages:- Timeout: Resource could not be reached - check network configuration and firewall rules such as a security group in a cloud environment
- Authentication Failed: Verify credentials and native user configuration
- Database Not Found: Ensure the specified database exists and is accessible

Updating Resources
Changes to resources (hostname, port, space, etc.) take effect immediately for new connections. Active sessions continue using old settings until they reconnect.Deleting Resources
Before deleting a resource:- Check for active sessions
- Remove it from any Connector listener rules
- Disable termination protection if enabled
- Confirm deletion
Spaces and Resources
Resources can be assigned to a Space to limit which Connectors can access them:- Resource with a Space: Only Connectors in the same Space can access it
- Resource without a Space: Any Connector can access it